

3D printer first layer calibration is the make-or-break skill that turns frustrating failures into reliable, professional-looking prints. Get this right and everything else—speed, strength, detail—falls into place. Mess it up and you chase ghost problems for weeks.
3D printer first layer calibration means dialing in the exact nozzle height, flow, and speed so the initial layer sticks perfectly flat and bonds to the bed. For beginners and intermediate users in the USA running everything from budget Creality machines to Bambu Labs setups, this single process eliminates most print disasters. Master it in 2026 and your success rate jumps overnight.
Quick Overview: Why First Layer Calibration Matters
- The first layer is your foundation—poor calibration causes weak adhesion, warping, or elephant’s foot.
- It directly impacts 3D printer troubleshooting bed adhesion issues by ensuring consistent squish and contact.
- Key factors include Z-offset, bed leveling, temperature, and slicer settings.
- Takes 15–45 minutes once you have the workflow down.
- Done right, it works across PLA, PETG, ABS, and flexible filaments.
Here’s the thing: most people blame their filament or printer when the real culprit is a lazy or inconsistent first layer setup. Let’s fix that for good.
Root Causes of Poor First Layer Results
Uneven leveling throws everything off. A bed that’s perfect cold can warp when hot. Wrong Z-offset is another killer—too high and the filament barely touches; too low and it drags or squishes into ridges.
Temperature swings, fast initial speeds, and incorrect flow rates compound the problem. Drafts or residue on the plate make even perfect calibration fail.
What usually happens is users tweak one variable and ignore the rest. Systematic calibration stops that cycle.
Step-by-Step Action Plan for 3D Printer First Layer Calibration
Follow this exact sequence every time you change nozzles, plates, or filaments.
- Prepare and clean the bed. Wash with dish soap and warm water. Dry completely. Finish with 90%+ isopropyl alcohol. Keep fingerprints off.
- Level the bed at operating temperature. Heat the bed (60°C for PLA) and nozzle. Run automatic leveling if available, then manual paper test (feels like light drag) at multiple points including center.
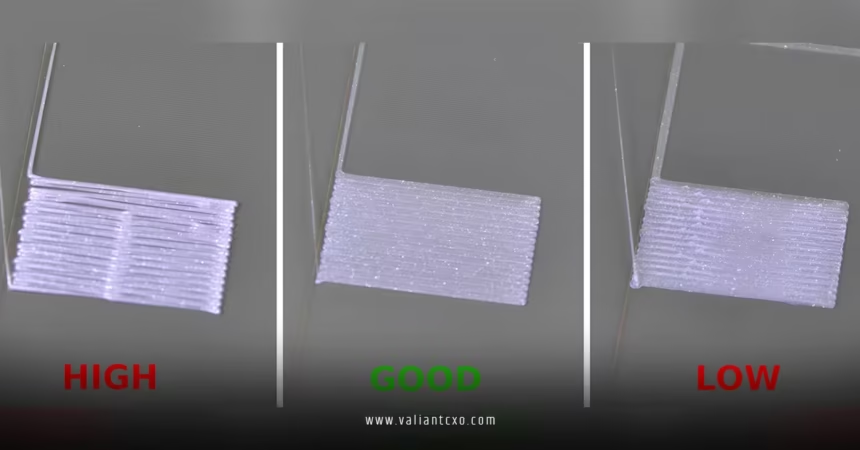
- Set and test Z-offset. Print a large single-layer square or use a first-layer calibration pattern. Adjust live Z while printing until you see smooth, slightly flattened lines that touch without gaps or excessive squish. Target a matte, even surface.
- Tune first layer settings in your slicer.
- Speed: 20–40 mm/s
- Flow: 100–110%
- Layer height: 0.2–0.28 mm
- Bed temp: match filament recommendations
- Print and inspect. Use a bright light to check for gaps, ridges, or lifting. Fine-tune Z-offset in 0.01–0.05 mm steps. Reprint the test until perfect.
Repeat this process after any hardware change. It becomes second nature fast.
Comparison of First Layer Calibration Methods
| Method | Best For | Time Required | Accuracy | Tools Needed |
|---|---|---|---|---|
| Paper Test + Manual | Beginners, all machines | 15–30 min | Good | Feeler gauge/paper |
| Live Z Adjust Print | Most users | 10–20 min | Excellent | Calibration pattern |
| Automatic Mesh + Probe | Prusa, Bambu, Klipper | 5–10 min | Very High | ABL sensor |
| BLTouch / CR-Touch | Upgraded printers | 10 min | High | Probe hardware |
In my experience, combining mesh leveling with a visual test print gives the best real-world results on consumer machines.

Common Mistakes & How to Fix Them
Relying only on cold leveling. Always heat the bed first—thermal expansion changes everything.
Printing too fast on the first layer. Slow it way down for better control and adhesion.
Ignoring filament diameter and flow. Measure your filament and adjust extrusion multiplier if needed.
Skipping re-calibration after plate flips or nozzle swaps. What I’d do: Run a quick test square immediately after any change.
Over-squishing the first layer to force adhesion. This creates elephant’s foot and makes removal painful. Fix by backing off Z-offset slightly and using proper bed prep instead.
For deeper context on related challenges, check our guide to 3D printer troubleshooting bed adhesion issues.
Advanced Tips for Perfect Results Every Time
Use a first layer calibration test model with squares or lines at varying heights. Adjust flow specifically for the initial layer in Cura, PrusaSlicer, or Orca Slicer.
For large prints, add a brim or mouse ears while keeping the core first layer dialed. Dry your filament—wet material flows inconsistently and ruins calibration efforts.
Ever wonder why some printers seem to “just work” while others fight you constantly? It’s almost always consistent first layer calibration habits.
Think of first layer calibration like setting the foundation of a house. Get the base perfectly level and compressed right, and the whole structure stands strong—no matter how tall you build.
For detailed patterns and models, see Teaching Tech’s first layer guide.
Prusa owners benefit from their official first layer calibration article.
MatterHackers also offers excellent filament-specific advice here.
Key Takeaways
- Always calibrate at printing temperatures.
- Clean the bed religiously before every session.
- Slow first layer speed is non-negotiable.
- Visual inspection beats guessing Z-offset.
- Re-calibrate after any hardware or filament change.
- Combine ABL with manual checks for best results.
- Proper calibration solves most 3D printer troubleshooting bed adhesion issues.
- Practice with test prints until it’s muscle memory.
Nail 3D printer first layer calibration and your entire printing game levels up. Grab a calibration pattern, clear your schedule for 30 minutes, and dial it in today. The consistency you’ll gain is worth every minute.
FAQs
How often should I perform 3D printer first layer calibration?
Every time you change filament, nozzles, or build plates. Once a week for active users even if nothing changed.
What’s the best way to check if my first layer is properly calibrated?
Print a large single-layer square. It should look smooth, even, and slightly matte with lines fully bonded and no gaps or excess ridges.
Does 3D printer first layer calibration help with bed adhesion problems?
Yes—directly. A well-calibrated first layer dramatically reduces 3D printer troubleshooting bed adhesion issues by ensuring optimal contact and squish from the start.

